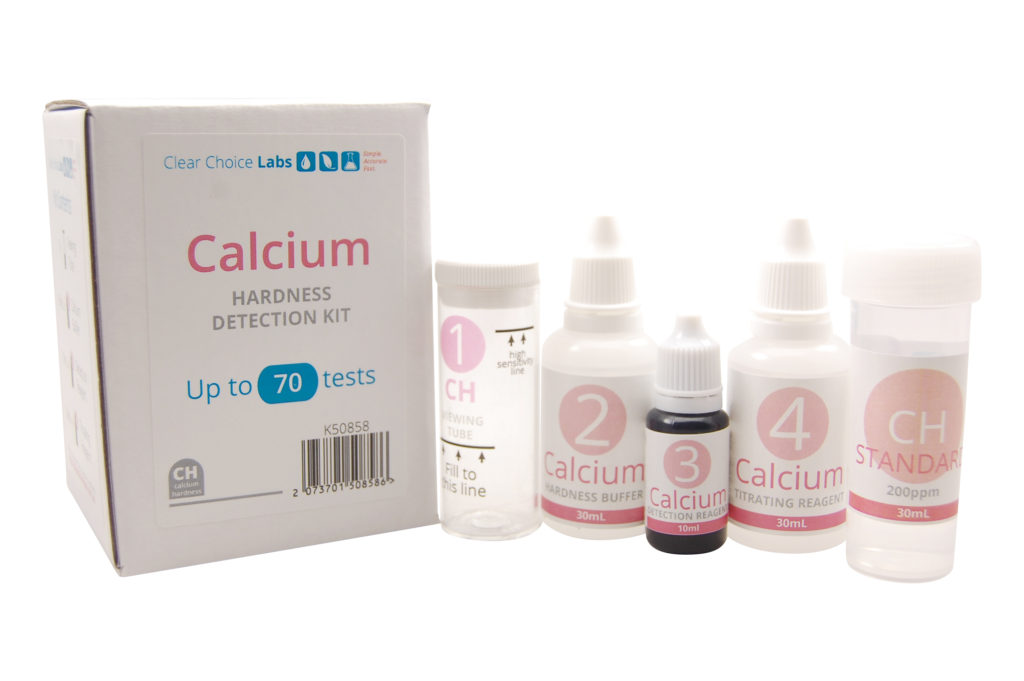
Instructions
How to test for Calcium Hardness (CH)
Dec
Water that has low Calcium Hardness (CH) tends to attack most pool surfaces (except vinyl pools). However, too much calcium leads to excessive scaling which can clog pipes and render salt-water generators inoperable. Therefore maintaining a balance of calcium is critically important to the long term maintenance of your pool.
The instructions on the sides of our kits are simplified reminders of the procedure for advanced users (see image below). These are the extended instructions for the Total Alkalinity Detection Kits, that give you all the needed details on how to test your pool for CH levels. You can perform either the standard test using 10mL of pool water and conserve reagents, or you can opt for a high sensitivity test that uses 25mL of pool water, but uses more reagent.
To ensure your kit is working, we have included a CH standard of 200ppm. When you use this standard instead of pool water, your test should read 200ppm. It is not necessary to use this at all, however it can provide reassurance if you are new to testing, or you want to test old reagents.
Standard Test
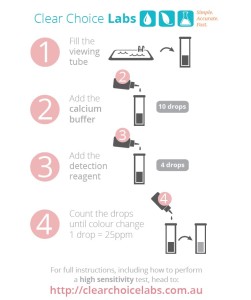 Rinse the calcium hardness viewing tube with pool water.
- Fill the calcium hardness viewing tube with pool water to the mark indicated (lower line).
- Add ten (10) drops of the calcium hardness buffer, and mix well. Replace the lid on the reagent immediately to extend the life of your kit.
- Add four (4) drops of the calcium hardness detection reagent and mix well. The solution should now be red, pink, or blue. Replace the lid on the reagent immediately to extend the life of your kit.
- Note: If the solution is blue, then you may stop the test here, as your CH is 0.
- One drop at a time, add the calcium hardness titrating reagent. Mix between each drop, and count the total number of drops added until the colour changes to blue. If you are unsure whether the colour change is complete, add one more drop – if there are no more changes, don’t count the extra drop in your total.
- Note: If the solution turns purple, or momentarily turns blue, and then fades back to red, you have metal ions in your pool causing interference with this test. Start the test again, this time adding 5 drops of calcium hardness titrating reagent after step 2 and before step 3. Then proceed with step 3 as usual. Add the five drops to the total obtained in step 6.
- Multiply the number of drops by 25 to get your CH level in parts per million (ppm).
- Dispose of the sample safely. Do not pour the sample and chemicals back into the pool, instead pour down the sink with some running water.
- Rinse the sample tube with tap water and store the kit in a cool, dark, and dry place.

High Sensitivity Test
- Rinse the calcium hardness viewing tube with pool water.
- Fill the calcium hardness viewing tube with pool water to the high sensitivity line indicated (upper line).
- Add twenty (20) drops of the calcium hardness buffer, and mix well. Replace the lid on the reagent immediately to extend the life of your kit.
- Add seven (7) drops of the calcium hardness detection reagent and mix well. The solution should now be red, pink, or blue. Replace the lid on the reagent immediately to extend the life of your kit.
- Note: If the solution is blue, then you may stop the test here, as your CH is 0.
- One drop at a time, add the calcium hardness titrating reagent. Mix between each drop, and count the total number of drops added until the colour changes to blue. If you are unsure whether the colour change is complete, add one more drop – if there are no more changes, don’t count the extra drop in your total.
- Note: If the solution turns purple, or momentarily turns blue, and then fades back to red, you have metal ions in your pool causing interference with this test. Start the test again, this time adding 5 drops of calcium hardness titrating reagent after step 2 and before step 3. Then proceed with step 3 as usual. Add the five drops to the total obtained in step 6.
- Multiply the number of drops by 10 to get your CH level in parts per million (ppm).
- Dispose of the sample safely. Do not pour the sample and chemicals back into the pool, instead pour down the sink with some running water.
- Rinse the sample tube with tap water and store the kit in a cool, dark, and dry place.
Want a printable version of these instructions? We have you covered!
Download (Calcium_Hardness_Test-Kit_Instructions.pdf, PDF, 416KB)
.