Help!
Reagent Lines and the Curvy Meniscus

08
Feb
Feb
The first time you use your kit you’ll probably notice that the pool water curves upwards at the inside edge of the tube, and doesn’t sit perfectly flat on the reagent line. This curve is called the meniscus and in this article I’ll explain what the meniscus is and why it’s important for pool testing.
The chemistry behind every test in your Clear Choice Labs kit is specifically and carefully measured, and because the amount of water used in each tube is reasonably small, using too much or too little water can vary the results. The best and easiest way to get the right result every time, is to start with the perfect amount of pool water every time! This is why all of our tubes come with clearly marked reagent lines to ensure you’re testing 10mL of liquid every time.
When trying to pour the correct amount of pool water into our tubes, a meniscus will form where the water curves upwards at the sides, this is an effect of the surface tension of the liquid. (Basically, the molecules in most liquids are more attracted to the materials making up the tube than they are to each other, so they cling to the sides). This meniscus curve can be confusing, especially as to whether to read the level at the bottom, top or middle of this curve.
The good news is that all of our tests and tubes have an upwards curving meniscus, and there’s one simple answer for all of them!
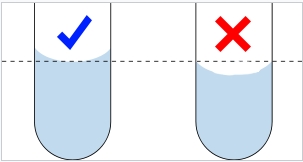
 The reagent line should be level with the bottom of the meniscus. Ignore the curving sides, and focus on the lowest point of the liquid, that’s the line you want to match with your reagent line. The easiest way to see this is to hold the tube straight up and down at eye level and look directly through the side of the tube, not at an angle. If your eyes are above or below the reagent line, you won’t see the meniscus correctly and the water level will be incorrect.
In the drawing, the dotted line is the reagent line you’re trying to measure to. Notice that the lowest point of the liquid is level with the line. It’s neither above nor below it. The sides of the liquid curve above the line, but they can safely be ignored.
In the real world it can be harder to judge the meniscus because it goes all the way around the tube and not just conveniently up two sides like the drawing. Often the meniscus will look like a film or even a viscous bubble on the surface. The same rules apply, look to the lowest level and measure at that point.
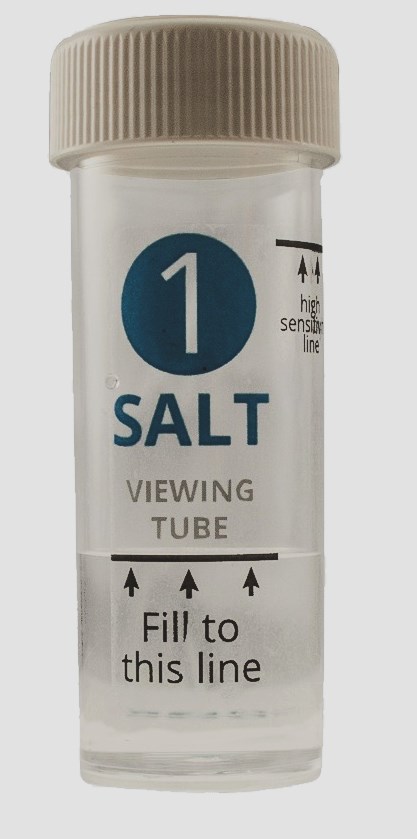
Below are some real world examples of our tubes and various menisci at the correct levels.
The reagent line should be level with the bottom of the meniscus. Ignore the curving sides, and focus on the lowest point of the liquid, that’s the line you want to match with your reagent line. The easiest way to see this is to hold the tube straight up and down at eye level and look directly through the side of the tube, not at an angle. If your eyes are above or below the reagent line, you won’t see the meniscus correctly and the water level will be incorrect.
In the drawing, the dotted line is the reagent line you’re trying to measure to. Notice that the lowest point of the liquid is level with the line. It’s neither above nor below it. The sides of the liquid curve above the line, but they can safely be ignored.
In the real world it can be harder to judge the meniscus because it goes all the way around the tube and not just conveniently up two sides like the drawing. Often the meniscus will look like a film or even a viscous bubble on the surface. The same rules apply, look to the lowest level and measure at that point.
Below are some real world examples of our tubes and various menisci at the correct levels.
With proper meniscus reading you are well on the way to highly accurate readings every time!
 The reagent line should be level with the bottom of the meniscus. Ignore the curving sides, and focus on the lowest point of the liquid, that’s the line you want to match with your reagent line. The easiest way to see this is to hold the tube straight up and down at eye level and look directly through the side of the tube, not at an angle. If your eyes are above or below the reagent line, you won’t see the meniscus correctly and the water level will be incorrect.
In the drawing, the dotted line is the reagent line you’re trying to measure to. Notice that the lowest point of the liquid is level with the line. It’s neither above nor below it. The sides of the liquid curve above the line, but they can safely be ignored.
In the real world it can be harder to judge the meniscus because it goes all the way around the tube and not just conveniently up two sides like the drawing. Often the meniscus will look like a film or even a viscous bubble on the surface. The same rules apply, look to the lowest level and measure at that point.
Below are some real world examples of our tubes and various menisci at the correct levels.
The reagent line should be level with the bottom of the meniscus. Ignore the curving sides, and focus on the lowest point of the liquid, that’s the line you want to match with your reagent line. The easiest way to see this is to hold the tube straight up and down at eye level and look directly through the side of the tube, not at an angle. If your eyes are above or below the reagent line, you won’t see the meniscus correctly and the water level will be incorrect.
In the drawing, the dotted line is the reagent line you’re trying to measure to. Notice that the lowest point of the liquid is level with the line. It’s neither above nor below it. The sides of the liquid curve above the line, but they can safely be ignored.
In the real world it can be harder to judge the meniscus because it goes all the way around the tube and not just conveniently up two sides like the drawing. Often the meniscus will look like a film or even a viscous bubble on the surface. The same rules apply, look to the lowest level and measure at that point.
Below are some real world examples of our tubes and various menisci at the correct levels.
 This shows a clear meniscus from the side including the double banding that occurs.
Picking the lowest point of the meniscus will give the best results.
This shows a clear meniscus from the side including the double banding that occurs.
Picking the lowest point of the meniscus will give the best results. |
 Some tubes and liquids do not give a discernible meniscus at all.
It’s still there, but not visible to the naked eye.
Some tubes and liquids do not give a discernible meniscus at all.
It’s still there, but not visible to the naked eye. |